How to Clear the Cache and Cookies in Your Web Browser
Why Clear Cache and Cookies?
Clearing the Cache and Cookies from a web browser is an important first step for almost any troubleshooting for internet browsing. The 'cache' is a tool used by your internet browser to speed up the page loading process. However, sometimes it can cause a problem when websites are updated and developed as files saved in the cache may conflict with what's actually coded into the website. Clearing Cache and Cookies is a way we can be sure that any issues you may come across are actually something wrong with the website, rather than inconsistencies caused by using different browsers.
Keyboard Shortcut for Most Browsers
If you are using Internet Explorer, Edge, Google Chrome, or Mozilla Firefox you can quickly clear cache with a keyboard shortcut. While in your browser, press Ctrl + Shift + Delete simultaneously on the keyboard to open the appropriate window.
IMPORTANT: Be sure and close/quit the browser and restart it after clearing the cache and cookies.
Google Chrome
- Click the Tools menu (three dotted lines in the upper-right corner).
- Select History.
- Select Clear Browsing Data from the left-hand side. Set the Time Range set to All Time. Check-mark Cookies and other site data and Cached images and files and select Clear Data.
- If on a Windows computer, close and re-open Chrome to save your changes. If on an Apple computer, go to the Chrome menu on the top menu bar and select Quit for the changes to take effect.
Mozilla Firefox
- Click on the Tools bar.
- Click on Options (On Mac, it's labeled Preferences).
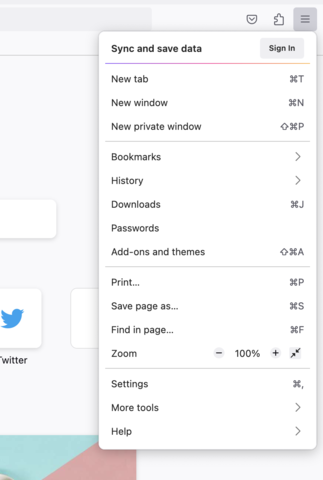
- On the menu to the left, select Privacy & Security.
- Under the Cookies and Site Data option, click the "Clear Data..." button.
- Select only the two options and hit clear now.
- If on a Windows computer, close and re-open Firefox to save your changes. If on an Apple computer, go to the Firefox menu on the top menu bar and select Quit for the changes to take effect.
Safari for macOS
- Click on Safari on the top menu bar.
- Click Preferences.
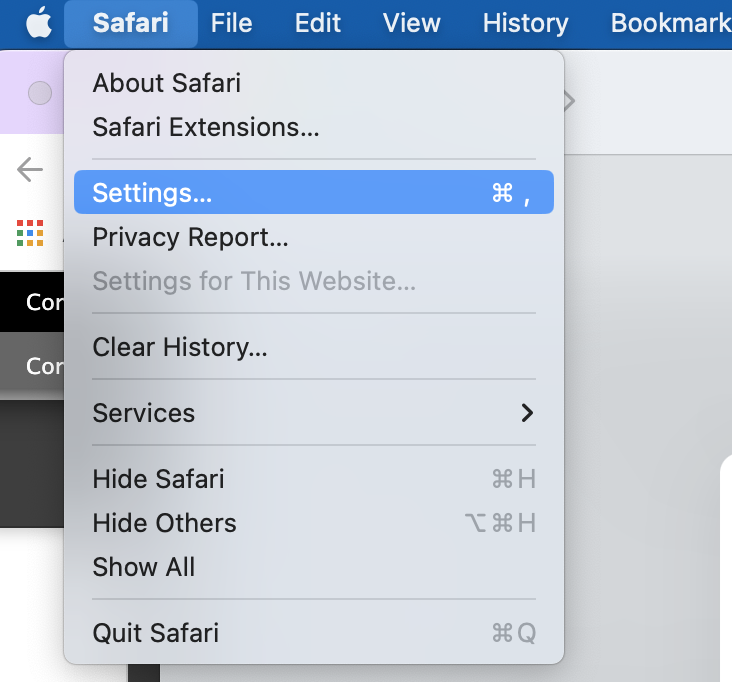
- Click the Privacy tab.
- Click Manage Website Data...
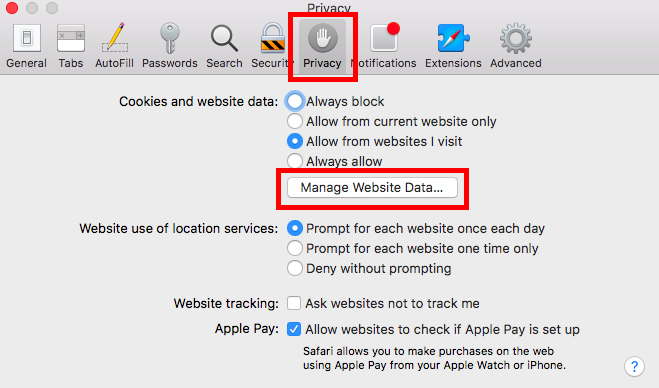
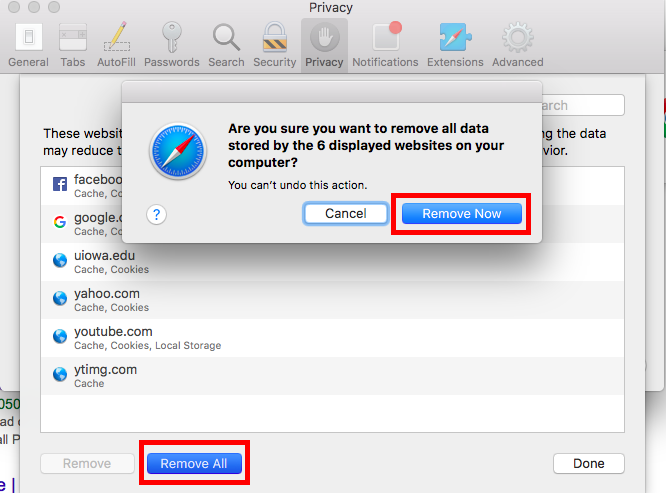
- Click Remove All.
- Click Remove Now.
- Go to the Safari menu on the top menu bar.
- Select Quit to close Safari and save your changes.
Microsoft Edge for Windows 10
- Click the Tools menu (three dotted lines in the upper-right corner), and open the Settings menu.
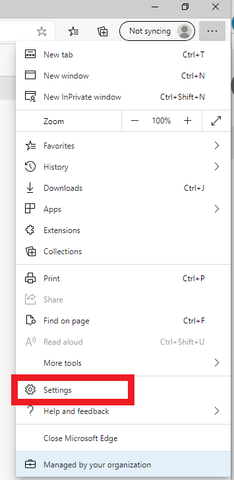
- Click Privacy, search, and services on the left-side menu.
- Under the section Clear browsing data, Click Choose what to clear.
- Select Cookies and other site data and Cached images and files.
- Click Clear Now.
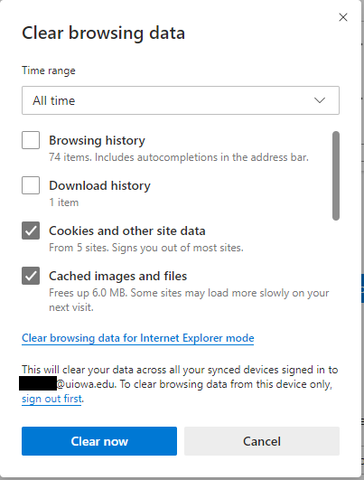
- Close Microsoft Edge completely for your changes to take effect.
Internet Explorer for Windows
- Click on the Settings menu in the upper-right corner.
- Click Internet options.
- Under the General tab on the upper-left-hand side, scroll down to Browsing history.
- Select Delete...
- Check the Temporary Internet files and website files, Cookies and website data, History, and Download History boxes.
- Select Delete.
- Close Internet Explorer and reopen it for changes to take effect.
Safari for iOS
- Go to the Settings app on your device.
- Scroll down to the Safari menu.
- Scroll down and select Clear History and Website Data.
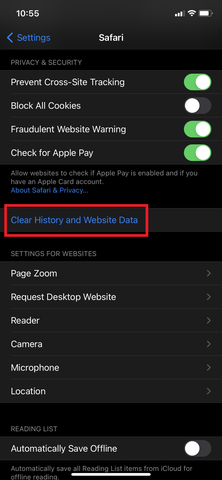
- A pop-up will come up verifying that you want to clear the History and Data. Select Clear History and Data.
- The button for Clear History and Website Data will turn gray when cache and cookies have been successfully cleared.
Google Chrome for iOS
- Open Google Chrome on your iOS device.
- Click on the menu toolbar in the bottom right corner.
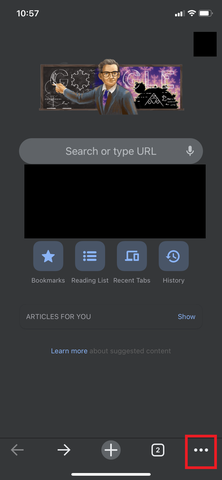
- Select Settings.
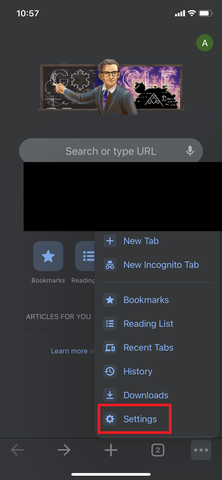
- Select Privacy.
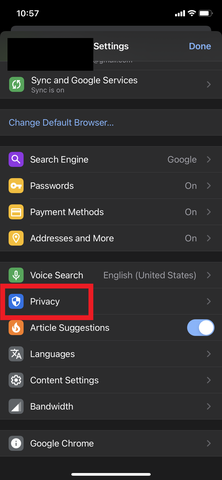
- Select Cookies, Site Data, and Cached Images and Files. At the top, set the Time Range set to All Time.
- Click Clear Browsing Data at the bottom of the screen.
- Then confirm by clicking Clear Browsing Data again.
Related Articles
Set Chrome as your default web browser
Windows 11 On your computer, click the Start menu . Click Settings . Click Apps Default Apps. Click Google Chrome. Under each file type or link type you want to change, click the current setting. For the best Chrome experience on Windows 11, be sure ...Knowledgebase Article: Displaying General Ledger Accounts in Task Windows in Sage 50
Issue Users need guidance on how to display General Ledger (G/L) accounts in task windows within Sage 50. Solution Follow these steps to configure Sage 50 to display General Ledger accounts in task windows. This process allows for easier access and ...